Make An Outline Brush in Procreate
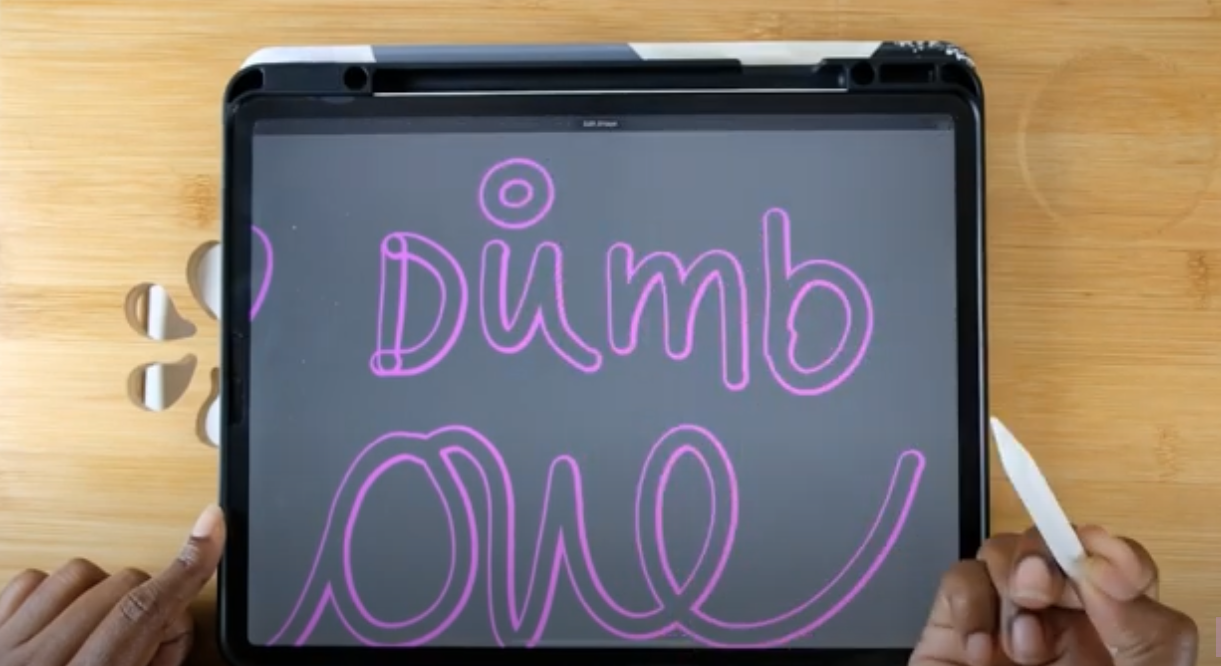
In this tutorial, you’ll learn how to create and customize your own outline brush in Procreate, perfect for filling in or outlining any design. This guide covers everything from naming your brush to adding a personal signature or image as the creator, helping you bring unique touches to your digital art projects. This technique is perfect for giving your text and designs a bold, outlined look or filling specific shapes with unique patterns. Experiment with this process to create your own brushes that suit your art style, and enjoy your new, custom-designed Procreate tool!
Visual learner? Scroll to the bottom for the step-by-step video tutorial.
Step 1: Set Up Your Canvas and Duplicate a Brush
Start by opening any canvas in Procreate—canvas size isn’t crucial here. Choose a brush you like; a streamlined square brush works well for this technique. Tap on the brush and duplicate it by swiping left on the brush name. Now, you’ll have a second brush to work with.
Step 2: Combine Brushes
Select both brushes by swiping right, then tap “Combine” to create a single, combined brush. By doing this, you have more flexibility in creating unique effects for your outline brush. In the combined brush menu, click the mode drop-down and select “Difference.” This mode allows the brushes to interact in a way that erases overlap, which is great for creating clean outlines.
Step 3: Adjust Brush Properties
Next, customize the brush settings. Open “Properties” for each brush, adjusting the maximum size, which will determine how thick or thin the strokes appear. Experiment with both brushes to see what thickness and spacing work best for your style. You may want to vary settings between the two brushes to achieve a layered effect.
Step 4: Test the Brush for Cursive and Print
This custom brush works particularly well for cursive writing, allowing for smooth, connected strokes. If you try printing letters, you might notice that some lines overlap, creating extra strokes. To fix this, either erase the overlapping areas manually or experiment by keeping the “pen” on the screen, creating a more continuous line.
Step 5: Fine-Tune for the Perfect Look
Once you’re happy with your brush, try adjusting the color and thickness to see how it appears on your canvas. Use Procreate’s built-in tools to add extra effects and make your brush even more unique.
Step 6: Name and Save Your Brush
To keep track of your custom brush, name it something memorable like “Outline Brush.” You can personalize it further by adding your name or even a signature image in the brush settings.
Browse My Collection of Custom Procreate Brushes
Pin It!
If you love this project, don’t forget to pin it on Pinterest so you can easily find it later and share it with others! It’s a great way to organize your favorite ideas and inspire your next creation.
Support It!
If you've enjoyed our time together and would like to support my work, a small gesture like buying me a “cup of coffee” goes a long way!


